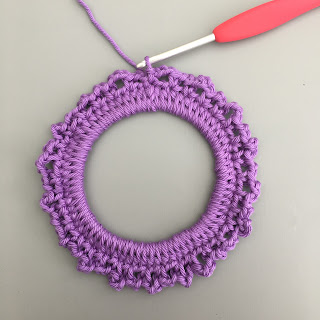
In today's post I thought I would give you a step-by-step guide to making crochet frames as they make perfect, quick end of term gifts for teachers.
Getting started
To make one crochet frame you will need:
1 x thin metal bracelet (my instructions are based on using a 7cm diameter bracelet) - you can pick these up quite easily online
3.5mm crochet hook
DK weight cotton - I use Stylecraft Classique Cotton DK
A tapestry needle to weave in the ends
A can of spray starch
A piece of cling film - I'll explain later!
Some blocking pins (optional
Terms (UK):
ch - chain stitch
dc - double crochet
htr - half treble
st - stitch
st - stitch
sl-st - slip stitch
tr - treble
Pattern
Work 68 htr into the hoop and sl-st into the first htr.
Tip: I crochet over the tail of my yarn so that I only have one end to weave in at the end.
Round 2:
*ch 2, miss 1 htr, dc into the next htr, 3ch, miss 1 htr, dc into the next htr. Repeat from * until you reach the last htr from the previous round, sl-st into this stitch.
This is what your hoop should look like after you have completed Round 2:
This is what your hoop should look like after you have completed Round 2:
Round 3:
*skip 2 ch-space, work 3 tr, 2 ch, 3 tr into the 3 ch-space created in the last round. Repeat from * until the end and sl-st into the base of the last tr stitch worked.
This is how your frame should look after you've completed Round 3:
This is how your frame should look after you've completed Round 3:
Tip: you can use any number of stitch combinations to create decorative points on your crochet frame. I have used 6 tr in to the 3-ch space with no separating chains and also a mixture of htr and tr stitches. You will think of any number of combinations too. Once you know the principles of crochet frame making you can customise
as you wish and if you need more half trebles to fill the hoop - don't
worry, add them in multiples of four, and then you simply need to create
more or less of the chain spaces in Round Two.
To create the hanging loop:
Pull up a loop, cut the yarn and weave the end securely, keeping the loop in tact, rather than pulling it through as you would do normally when finishing off your work.
Finishing:
You've now probably got a slightly frilled and floppy looking crochet frame which is where the spray starch and cling film come in! Set your frame on a piece of cling film (this is a good idea because you don't want to starch your table or table cloth), spray it liberally with starch and use your hands to flatten out any frilly bits and then leave to dry.
If flattening down with your hand doesn't settle the work, you can pin it down to dry which is why I often place my cling film on a thin polystyrene sheet as this grips pins nicely. The starch dries quickly and then your finished crochet frame is ready for some artwork.
If flattening down with your hand doesn't settle the work, you can pin it down to dry which is why I often place my cling film on a thin polystyrene sheet as this grips pins nicely. The starch dries quickly and then your finished crochet frame is ready for some artwork.
Adding 'art work':
Once the frame is complete and dry, our son draws a picture on a circle of card (approximately 8.5cms diameter) and I use craft glue to attach the drawing on to the back on the frame, with the drawing showing out through the aperture. Alternatively, you could use a photograph or an image from a postcard or just leave it empty for your recipient to fill with a favourite image.
If you're looking for a quick crochet gift, I hope you might give crochet frames a try - I would love to see what you make! x


This is a great idea, have some cotton leftover from last year's gifts which were facecloths so might make these this time. Where do you buy your hoops?
ReplyDeleteThanks Anna, I've bought some from a seller on Etsy (who is now out of stock) but I've seen some on Amazon that I'm going to try - thin plastic bracelets would work as well as metal ones xx
DeleteThanks Helen, do you know how they're described?
DeleteJust sent you an IG message with details xx
DeleteOh these look amazing! R's teacher & TA are very lucky...they will be thrilled with these gifts.
ReplyDeleteThanks so much Kate, just relieved that R has such simple requests! xxx
DeleteThis is such a lovely gift idea Helen and thank you for the tutorial. I can definitely see myself making these!
ReplyDeleteThanks Tamara! They make such great gifts - R has asked that I make them every year until he reaches big (secondary) school!! x
Delete